No this article is not about cloning beautiful human bodies. Sorry, but this is about assembling a box of parts into a small replica of something recognizable. I build my first model when I was around 5 years old. It was a model T Ford. No, actually, it was a model of a model T Ford. What impressed me the most about this model, aside from it being something I could put together at that age, was that the wheels rolled, the doors opened, and you could open the engine compartment and look at the engine. Over the years I’v built many model cars and airplanes. Some the airplanes even flew under their own power. (usually a rubber band) As an adult, the number has greatly decreased. However several Christmases ago, I was given a model of the Leonardo da Vinci Helicopter and recently used a part of one weekend to assemble it.
This was a gift, but a quick search found PATHFINDERS Design + Technology, the company that makes this kit. There are several places on the Internet that sell this, and many other da Vinci models. Mine was purchased at a local store front, so check your local hobby shops and see what they carry.
Everything you need is in the box, and the instructions are very simple and clear. Before I knew it I had the first gear completed and was well on my way to finishing the second.
So I stopped and to take a picture.
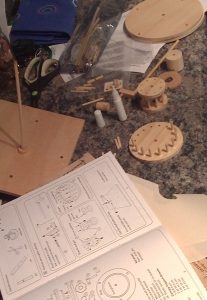
I should point out the base plate bushing jig, seen on the left edge of the picture. The shaft sticking up out of the base plate is a chop stick shimmed with scotch tape to exactly fit the hole in the plate and hold the bushing aligned with that hole as the glue dries. The instructions say: exactly center the bushing over the hole in the base plate. This was the only way I could see to do that.
After a bit more work it was time for another picture.
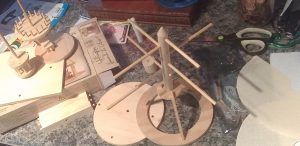
While the base support struts are glued to the base ring and the main shaft ring, forming a stand for the sail cloth screw’s main shaft. The main shaft is not glued to the shaft ring, but fits in fairly tight just by friction. The canvas support dowels are also left unglued. While some fit snuggly into their holes, others are fairly loose and will fall out from time to time until they are glued to the outer rail of the screw. They are left unglued to provide flexibility in the outer rail mounting and the canvas. The places to glue and those to not clue are clearly marked and annotated in the instructions and diagrams. One thing that was a bit strange is the mounting of the eye hooped screws that attach to the base ring as tie off points for the string rigging. They magically appear in the diagrams with no written instructions on when they are to be installed. Sooner is probably better than later.
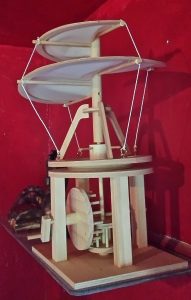
After some more work, I found myself finishing the framing, so it was time for another picture.
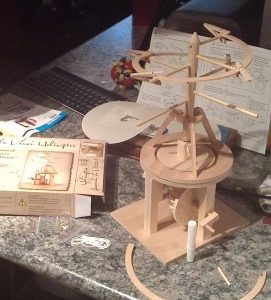
Two things to note in this picture: First, you can see that the eye hoop screws have not yet been installed; and second, is a short piece of dowel, lying on the marble counter, in the lower right corner of the picture. This is that proverbial extra piece, common to complex models. You either get an extra piece that duplicates a piece already in the kit, or some random piece either from another kit, or from scrap pieces parts. This kit had that one extra dowel piece. All the other parts matched the parts list except for this left over piece.
Some additional work and another break for a picture.
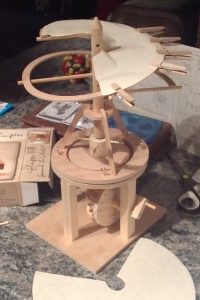
Hanging the canvas looks harder at first than it actually turns out to be. To make it work, first glue down the leading edge of the canvas to the support strut. Once that is dry, you can begin gluing the outer edge of the canvas to the outer rail. Lining up the edge of the canvas with the edge of the rail distorts the canvas and needs clamps to hold it in place while the glue dries. The miniature clothes pins are supplied for this task.
With the remaining canvas glued in place and the rigging strings tied off, glued, and trimmed, the model is ready for display. If I were doing this model over I would start by painting each wooden piece with polyurethane to protect it from dust and grease. Other than that, this model was a lot of fun to build and looks very nice as a display piece. The box rates this project for ages 9 and up. Try this model, or one of several others that look interesting. I’m sure you will have fun.